What is Solex ?
Solex is a free open source Web application testing tool built as a
plug-in for the
Eclipse IDE. It provides functions to record a
client session, adjust it according to various parameters and replay it later typically in order to
ensure non regression of the application's behaviour (with stress testing capabilities being added at a
later stage).
By recording, we mean that Solex acts as an HTTP
proxy and records all HTTP requests and responses going through the wire between a Web client (eg. a Web
browser) and a Web server. The task of replaying a scenario consists in sending the previously recorded
and eventually customized HTTP requests to the server and asserting each response.
Solex 0.5.0
works with Eclipse Release 2.1.2, Build id: 200311030802 and Solex 0.5.3 works with Eclipse
Release 3.1.1, Build id: M20050929-0840. You will also need a JRE 1.4.x or later.
Why another testing tool ?
Solex started as an internal project because we were unable to find an open source testing tool fully suitable
to our needs and in particular capable of dynamically altering requests. Furthermore, the tool was
expected to be fully integrated with our internal development environment based on the Eclipse platform.
For some web applications, a request depends on a
previous server's response. To address such a requirement, Solex introduces the concept of extraction
and replacement rules. An extraction rule tied to an HTTP message content will bind an extracted
value with a variable. A replacement rule will replace any part of an HTTP message with a variable
content.
Solex therefore provides an easy way to extract URL
parameters, Header values or any part of a request or a response, bind their values with variables and
then replace URL parameters, Header values or any part of a request with the variable content.
Example:
Let's imagine the next two requests recorded from a Web browser:
- GET http://www.myServer/myWebApp?action=connect HTTP/1.1
- GET http://www.myServer/myWebApp?action=list&dynamic_id=12345 HTTP/1.1
Replaying these two requests without any modification
may fail because dynamic_id must be different each time. This value may come from the first response body
content. By using Solex, it is possible to add an extraction rule to the first response (e.g. obtaining
the value 12345) and a replacement rule to the second request (e.g. populating the dynamic_id parameter
with the value extracted).
Moreover, Solex provides the user with the
capability to add assertions for each response. Once a response has been received, all assertions of this
response will be called to ensure that it is valid. If not, the playback process is stopped.
Solex provides several kinds of rules and
assertions, the most complicated ones support regular expressions and XPath.
What can I do with Solex?
- Solex can record HTTP messages by acting as a Web proxy.
- Recorded sessions can be saved as XML and reopened later.
- HTTP requests and responses are fully displayed in order to inspect and customize their content,
thanks to replacement rules.
- Solex allows the attachment of extraction or replacement rules to any HTTP message content, HTTP
header or URL parameter.
- Recorded requests can be filtered to remove or disable unwanted resources, like .jpg, .gif.
- Solex allows the attachment of assertions to responses in order to validate a scenario during its
playback.
- Solex can replay an HTTP session request by request or all requests at once.
- Playback results can be exported as XML with an optional XSL transformation.
What do I need to run Solex ?
- The primary requirement is to have Eclipse (http://www.eclipse.org)
version 2.1.2 (or above) installed on your computer.
- Download a Solex distribution from Sourceforge (http://sourceforge.net/projects/solex).
- Install the Solex plug-in: decompress the Solex archive in your Eclipse plugins folder and start
Eclipse.
- Follow this tutorial.
How does it look like ?
The easiest way to see the Solex components is to open
the dedicated Solex perspective which supplies an editor and two views. All
".slx" extension files opened from Eclipse will invoke the Solex editor. The Message Body Content view shows the content of a request or a
response when its body is selected.
The Playback Results view displays requests and
responses sent and received during the playback process. It also displays all variables dynamically
created during the process.
Getting Started
Recording
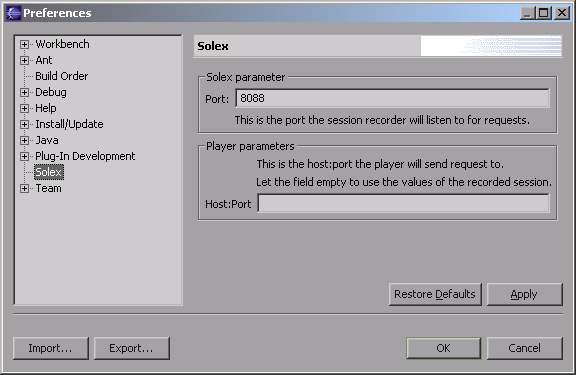
We will start by recording an HTTP session with a
Web browser. First, we must set the port you want to be used by the Solex integrated proxy.
Open the Eclipse preferences pages, choose the Solex
section and enter any free port, eg. 8088.
Also, the player can be configured to play a session
against a server different than the one used to record the session.
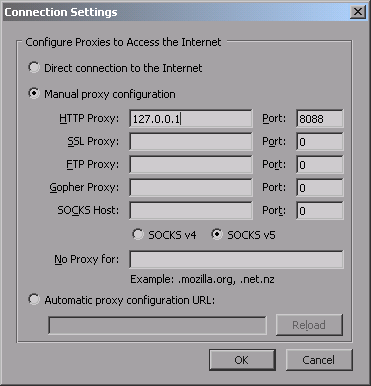
Finally, configure your browser to connect through a
web proxy. The proxy address (also called proxy server) is the computer where Solex is running. The proxy
port is the value previously entered in the Solex preferences.
The sample picture below is taken from the Mozilla
Firefox settings, with Solex running locally.
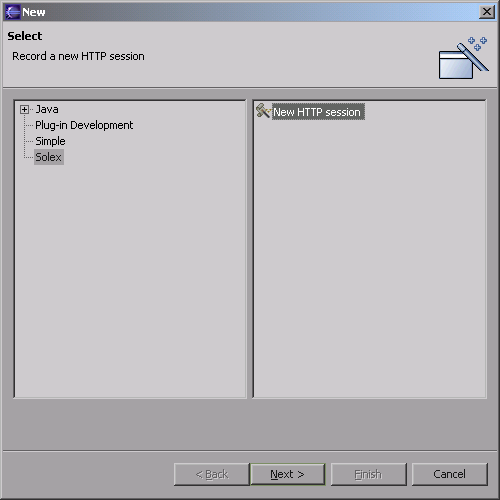
Create a new Solex session file by using the standard Eclipse New Other... menu entry, in the File
menu. Select the New HTTP session option in the Solex
section and click Next.
After choosing a file name, a new dedicated session editor is opened.
The session is almost empty and ready to be used for a recording.
A Solex session always includes a
Constants
node. This element gathers named values that are created by hand.

This screenshot shows a session having one constant, named cte1 and and bearing the value
val1.
To edit constants, double-click on the Constants node.
We don't need constants to record, so let's roll.

The recording process can be started from the Eclipse toolbar or the Solex menu. The icon is
the one with a red dot. You can now navigate through the Web application you want to test, and the Solex
editor will record and simultaneously display in real time the HTTP requests and responses.
In this tutorial, during the session recording, we simply go to
Google, then we search the web for the
solex keyword and go to the Solex project page.

Stop recording once your session is over. Use the Eclipse toolbar or the Solex menu to do
this. The icon is the one with a red square.
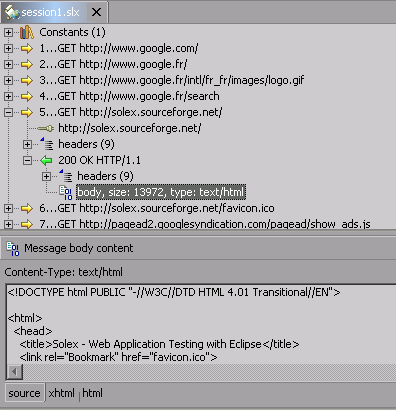
The editor should now show all the requests recorded during the session.
Each request may be expanded to reveal its URL and the corresponding
URL parameters. HTTP headers are also presented, along with the responses.
When a body is selected, its content is shown in the Message Body Content view. Three tabs are selectable:
- source: the body content is shown as-is,
- xhtml: a tree is used to show the body content.
- hmtl: the source but formatted.
The recording phase is complete and we'll now start to edit this
session to let it do something of interest.
In this section, we'll add rules and assertions to our
session. A rule or an assertion can be created by two means: by using the contextual menu (right button
click with your mouse) on the desired item, or with the buttons found on the Body Content view. The Body Content
view buttons are used when creating a rule based on a regular
expression.
Replacement rule
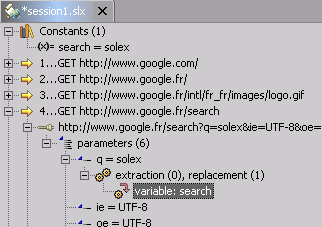
We'll first do a very simple replacement of an URL parameter's value. The first step is to
create a constant (double-click on the
Constants node) with a
value of "solex" and named "search".
We can now add a replacement rule for the URL
parameter "q" of the google search request. This parameter contains the search keywords. Do a right click
on the "q" parameter and select Add replacement rule. Then,
select in the combolist the constant previously created and you're done. The rule should appear right
under the parameter node, as in the screen shot.
At playback time, the parameter "q" will be replaced by the constant's value, which is "solex".
Assertion
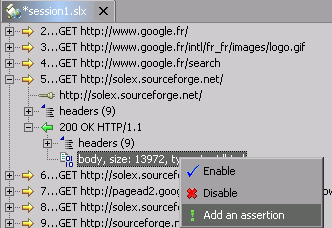
We now want to assert the Solex project page on
Sourceforge.net. We'll check that the HTML <title> tag
exists and contains "Web Application Testing with Eclipse " and that the page doesn't contain the
sentence "Not for Eclipse" (it does make sense, doesn't it?).
Open the assertion dialog box: right click on the body of the first sourceforge.net response, as depicted
in the screen shot.
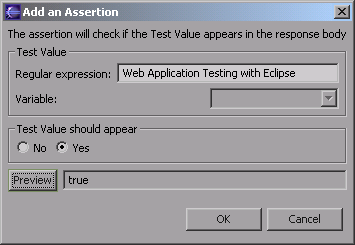
Fill in the
regular expression field with the string
that will be searched: "Web Application Testing with Eclipse". The
Preview
button computes the regular expression and returns
true if
the regular expression produces a token contained in the response. Which, hopefully, is the case.
Notice that an assertion allows you to assert the existence or not of the
regular expression, i.e: if you want to assert that your regular expression doesn't exist in the body,
write your regular expression (ex: "Not for Eclipse") and false in
the combolist.
You can also assert with a variable/constant
value: erase the regular expression and choose a variable name in the combolist.
Extraction
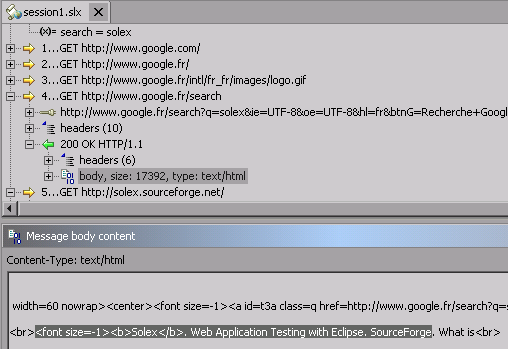
We'll now add an extraction rule to the Google response page in order to extract a value
using a regular expression.
Select the body of the google response. The
Message Body Content
view shows its content. We want to extract the Solex page title from the Google search results. The first
step is to select a meaningful excerpt from the HTML code.
When selecting a body part, it is assumed that you select the first delimiter of the token to extract or
replace, the token itself and the last delimiter. Both first and last delimiters may be empty if you
search an exact phrase, which is useful mainly for
assertions.
The string
<font size=-1><b>Solex</b>. Web
Application Testing with Eclipse. SourceForge contains the first and last delimiters, and the
token we want to bind to a variable.
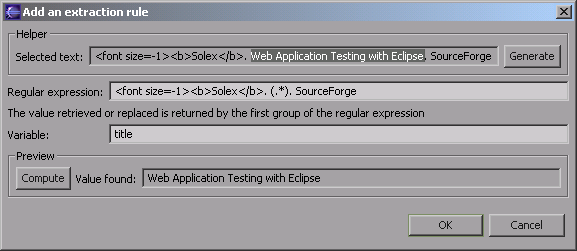
This time, the rule is added from the Message
body content dedicated view by using one of the two buttons located at the top right position of
this view. The way to create a rule based on a regular expression is the same for both extraction and
replacement rules.

The extraction rule button is the rightmost one.
At the top of the dialog window, an Helper is provided to simplify the
generation of common regular expressions. The string in it is the one previously selected in the Body Content view.
Then, as we selected a string, the Helper section is
enabled and provides you with the ability to select the token. The Generate
button will then compute a regular expression returning the token. You can experiment with the regular
expression until you're satisfied. In the sample, "title" is the variable name that will receive the
extracted value. The Compute button computes and displays the
value found in the originally recorded session.
You can get a list of the available variables and their
value at any point in the session by right-clicking on a request and selecting Display Available Variables.
Warning : you
can overwrite a constant with an extraction rule, but it is not advisable to do so as it could be
misleading. We include this functionality because it could be very useful to provide a default value for
a variable. Internally, if a variable is created with the same name as a constant, they both exist during
playback, but the variable has priority over the constant.
XPath
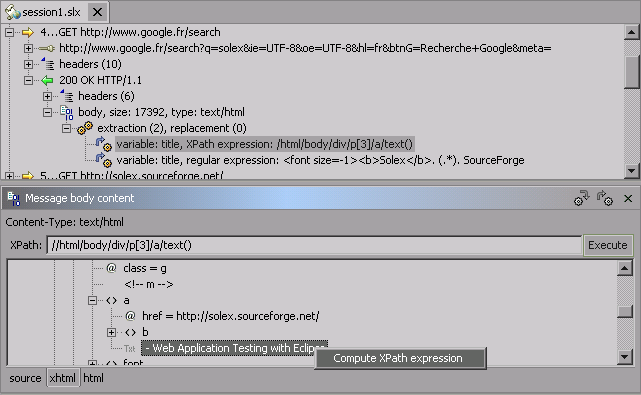
The ability to extract an expression using XPath is also available in
Solex. It appears through a dedicated tab (xhtml) in the Body Content
view. It offers a tree view of the HTML page. You can type in an XPath expression in the input field and
execute it to highlight the corresponding node(s). A very simple assistant, found in the contextual menu,
can generate the XPath expression from a selected node.
A valid XPath expression must return a single node in order to be usable by an extraction rule.
Filters
Solex offers a way to filter the elements of a
session. These filters are not dynamic, meaning that they are launched on a session after the record
phase, not during it. There are of two kinds: filters on HTTP requests and on HTTP headers. They allow
you to enable, disable or delete requests or headers based on a simple pattern.
Playback
At last, we can run the session. The target host can
be configured in the preferences. If you don't supply one, the
host used for recording will be used.
 Two playback buttons are supplied. The first one (leftmost) plays one request at a time and
the second one (rightmost) plays all requests.
The Playback Results view displays a summary of each
request sent, its response status code, the time to first byte, to last byte and all variables
dynamically created. Constant are displayed between parenthesis.

An export button located on the upper right corner of
the Playback Results view allows you to export results as XML.


 This screenshot shows a session having one constant, named cte1 and and bearing the value
val1.
 The recording process can be started from the Eclipse toolbar or the Solex menu. The icon is
the one with a red dot. You can now navigate through the Web application you want to test, and the Solex
editor will record and simultaneously display in real time the HTTP requests and responses.
 Stop recording once your session is over. Use the Eclipse toolbar or the Solex menu to do
this. The icon is the one with a red square.
 We'll first do a very simple replacement of an URL parameter's value. The first step is to
create a constant (double-click on the Constants node) with a
value of "solex" and named "search".
 Fill in the regular expression field with the string
that will be searched: "Web Application Testing with Eclipse". The Preview
button computes the regular expression and returns true if
the regular expression produces a token contained in the response. Which, hopefully, is the case.
 We'll now add an extraction rule to the Google response page in order to extract a value
using a regular expression.
 The extraction rule button is the rightmost one.
 Two playback buttons are supplied. The first one (leftmost) plays one request at a time and
the second one (rightmost) plays all requests.
